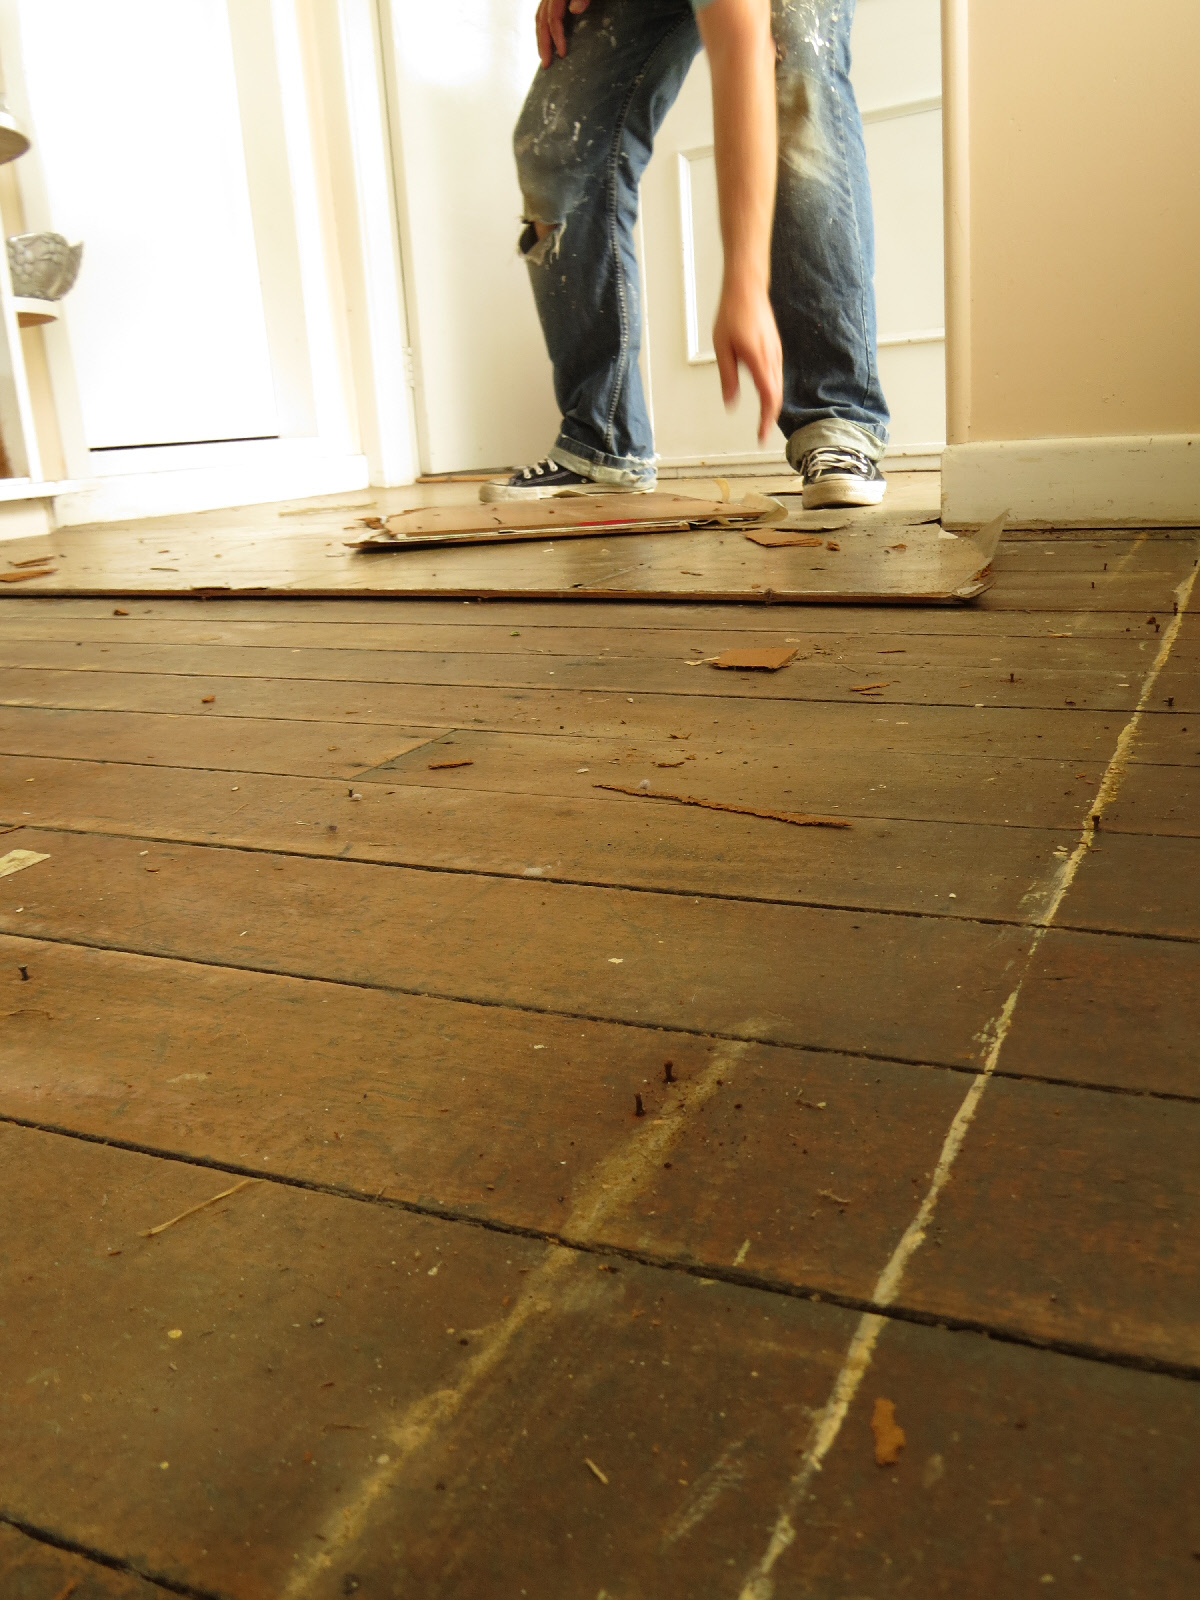
We are delighted to have Matai floorboards in our bungalow and have a big job in front of us to bring them back to their original splendor.
Having been covered under several layers of carpet and linoleum for decades, the original boards are in good shape, in the scheme of things!
We first discovered our matai boards the first weekend we moved into our 1926 house under a pile of 1946 newspapers. As we made our way through the house over the past nine months we’ve uplifted all of the carpet now — 100% matai flooring throughout.
We are happy. Our intention is to bring the house back to its original glory from 3 metre high studded ceilings, to bare wooden window frames, to original floor boards. We haven’t attempted to restore wood like this before, so this is a first. A rediscovery.
There are two types of sanding: a big, heavy drum sander (that can take off 0.5mm or more of wood and level the floor boards, and if you are successful, almost take the wood back to new) — or a refinishing sander (which takes off the surface discolouration, paint, varnish or polyurethane but doesn’t completely level the floor). We’ve chosen the latter method in order to retain the floor’s character: slightly uneven boards and dark stains around nails. Glorious!
The original floorboards are 90 years old. Like many bungalows of a similar age, native matai was used throughout. This tongue-and-groove flooring was nailed directly on to the foundation beams so over the years it is not surprising that the wood has moved and weathered (no underfloor insulation of course), creating wider cracks than probably ever intended.
 Oil vs Polyurethane?
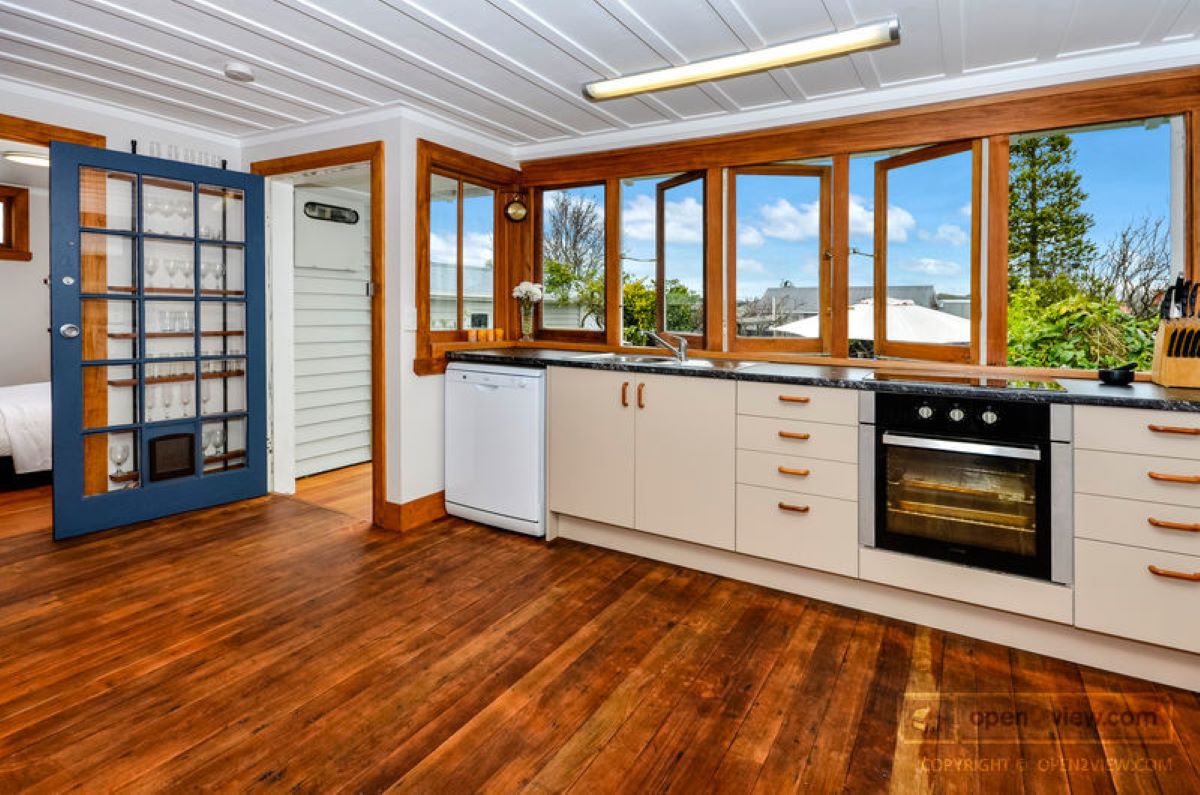
Our aim is to restore, sand and oil all the original flooring. We like the more natural look of oil — a matt look, easier to repair when scratched or marked, and more in keeping with the look and feel of the house, in our eyes, rather than polyurethane. Everyone is different and a glossy polyurethane floor may be perfect for someone else, just not us.
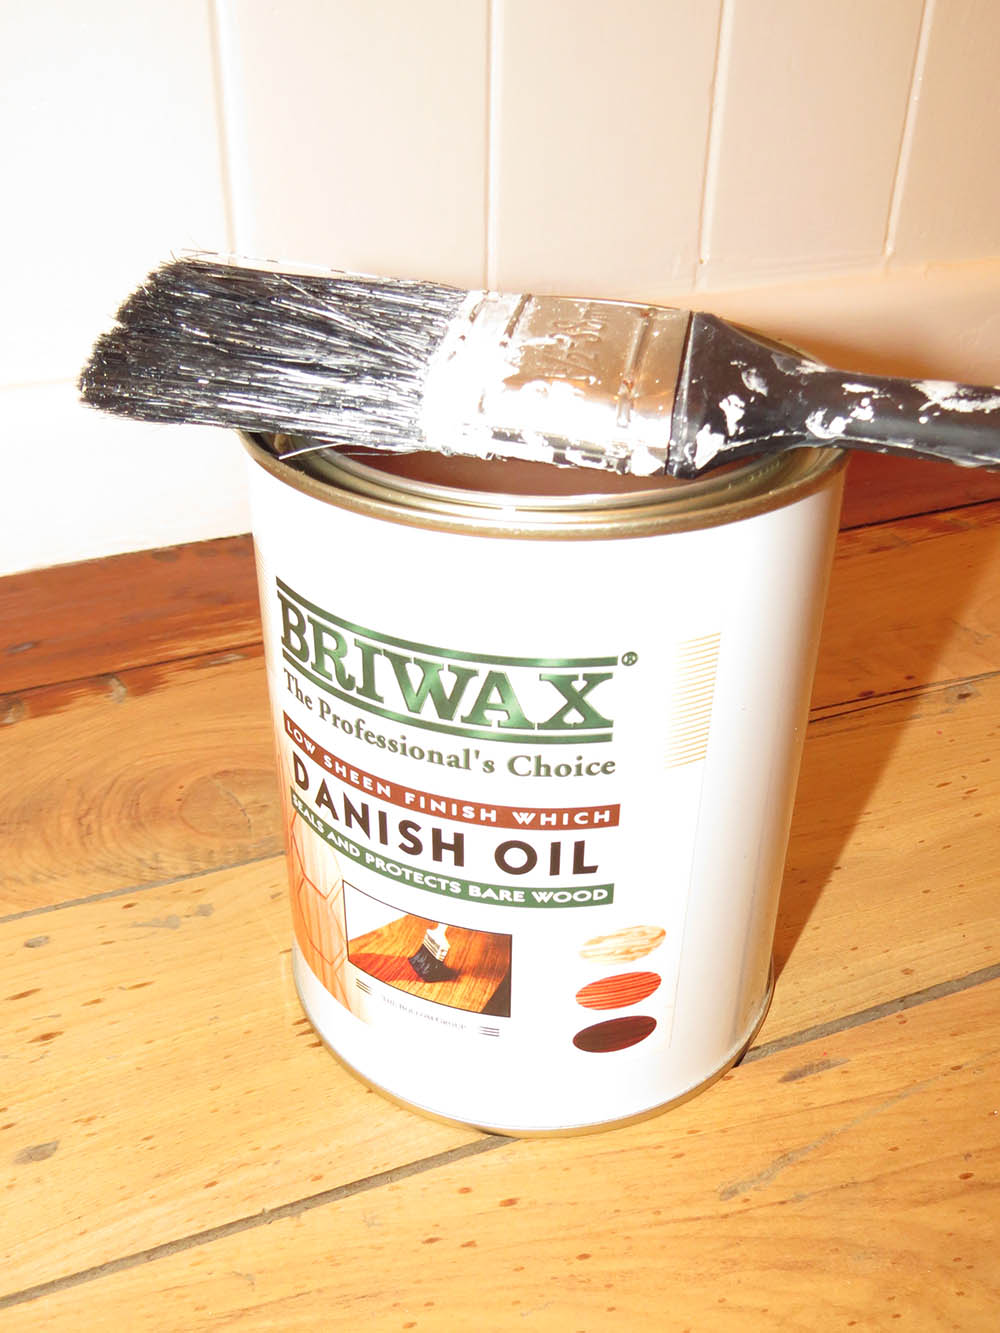
You can’t use just any old oil for the boards. We’ve used Danish Oil which feeds and strengthens the wood and contains a combination of 1/3 tung oil, 1/3 mentholated spirits, 1/3 varnish. Matai floorboards are quite difficult to paint or stain, so we are comfortable that we’re doing the right thing with oil.
We have not completely finished our first stage of renovations (kitchen/bathroom) so once the builders are gone, we’ll turn our attention to sanding the entire house ourselves. In the meantime, we’ve started in smaller rooms and have had fabulous results that we are really proud of.
Before you oil you do need to prepare the surface though. Yep, preparation is time consuming but makes the difference between a great job and a rough one.
Here’s how we approached it
- Prepare floor
Remove protruding nails or bang ’em in with a nail punch to ensure they rest below the surface about 1mm or so. Otherwise when you run the sander over the nails it will rip the paper and end up with shiny nails! If you have a lot of thick paint or glue, you may want to get the bulk of it off with paint stripper first.
- Sand entire floor area
We intend to hire a grunty refinishing sander for the majority of the house, however for the bathroom and pantry we’ve opted to use a hand-held orbital sander while we figure things out. 80 grit sandpaper is a good start (tough stains may need 40 grit). We didn’t intend to restore back to ‘new’ and completely flatten the floor, rather just remove old paint and the top surface that has layers of in-ground dirt from decades of use. The idea of wooden boards telling a story is important to us so we didn’t want to sand away all the history of time.
- Fill holes
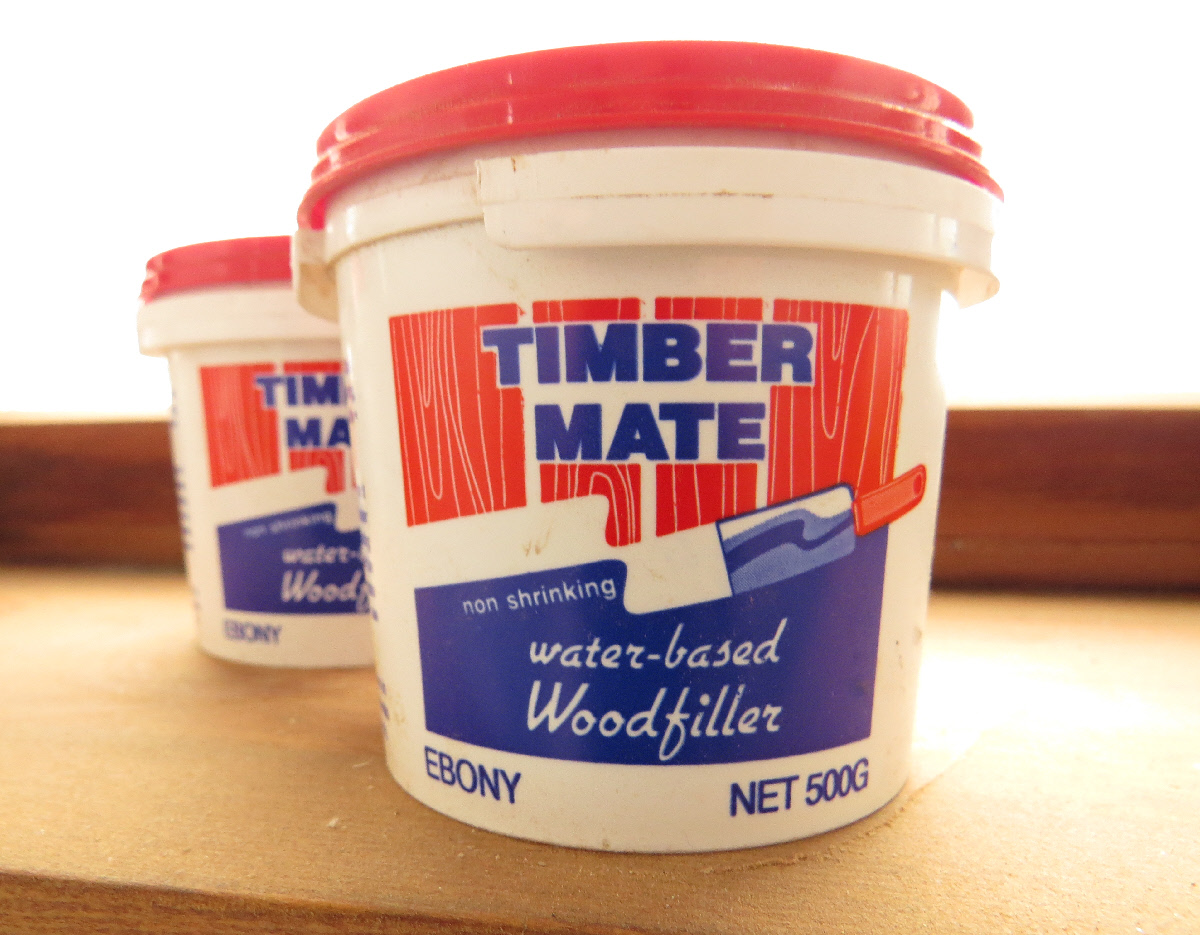
To fill old nail holes and knots we’ve used *Timber Mate [SEE POST SCRIPT]. This is a little like putty to apply and makes a mess. Keep a bowl of water and wet cloth handy, moisten the filler (mix with a small amount of warm water) then run a grouting paddle/tool and push down hard to fill the gap. Scrape off the excess (gather it up to reuse it later). Once the gap is filled, use a damp cloth to rub the floor taking off excess Timber Mate which also helps to make it smooth — only leaving a small amount of residue that can easily and quickly be sanded off when dry.
- Light sand again
Lightly sand the area. This will flatten the filler smooth and also lift of any smudged filler than may have encroached onto the boards themselves. We used 120 grit.
- Sweep or vacuum up all dust
As there is vanish in the oil mix, you don’t want to have any extra gunk on the surface. Keep free of dust, dirt, paint flecks and stray cat hair!
- Apply Danish Oil (3 layers)
Follow instructions on the tin. Avoid corners or patches going sticky by using your brush to wipe off excess oil. You will need to wire-wool the surface before the final coat – but this is explained on the tin. Our recommendation is certainly Danish Oil. We’ve used a brand called BriWax but there are other brands we’re sure that does the same job.

 *This isn’t a product endorsement for Timber Mate (at this stage) but we did extensive research of what others used and it came back as a highly recommended product to use. We’ll let you know if it stays in place in a years time when we’ve been through the heat of summer and the cold of winter.
[POST SCRIPT#1: Great for nail holes. We actually tried using Timbermate to fill the gaps between the floorboards too in a small section. This didn’t work so well as the floorboards expand and contract so the filler is inclined to crack. We’re going to check out something new: Selley’s flexible floor filler especially for floorboard gaps, which we are told will hit the shops early November. We’re very excited and will report back soon as there’s nothing like it on the market.
POST SCRIPT#2: We did use Selley’s No More Gaps for Timber Flooring in an area in the laundry and it worked extremely well. We had it down for about a year (before we moved on to a villa) and throughout that time it stayed put and didn’t crack – unlike Timbermate which did crack through the seasons. So a big tick from us although it will work out to be a little bit expensive when doing a large area.]
So much to do! Seeing progress unfold before our eyes is brilliant.
You’ve seen the state of the ‘before’ photos. This is ‘after’.


July 22, 2024
Hi Julie, what an incredible post I’ve come across. Just so happens, I’m about to replace some Matai (i think it is Matai) flooring for the little house we have purchased. My question is how did you replace yours without breaking the tongue and groove? Even if you did, can you take me through the process of replacement? Also love the tip about the selleys floor filler, and also the danish oi.l I may go that way as I was going with gonna go with polyurethane But the oil look sounds a lot better. Thankyou :)
July 24, 2024
Hi Roxanne, It’s great that you found the post interesting! We didn’t actually replace the matai flooring in the blog but restored it — so we can’t share any tips on replacing it per se. There were areas of the house where it boards were uplifted and replaced due to rot, but that would have been done by builders so I won’t have any photos of advise there. Hope it all works out! >>Julie
December 27, 2021
Hi Julie.
Thank you for your information packed step by step process for Matai floorboards.
I have taken up the carpet in all bedroom’s and have been living with them in their natural beautiful state. I so would like to oil them yet my conundrum is that the rest of our home’s floorboards are polyurethaned not in good condition. It is a 110sqm with 2 good sized bedrooms with 3rd a king single. The natural wood is so much nicer than the in your face gloss yet I am imagining the cost to remove the vanish may be $2000 to $3000 plus the cost of redoing whole home..the Joy’s 🙄. Of living with other people’s decorating decision’s.
Well you now have me fascinated with your blogs and look forward to more inspiration from you Julie.
Xmas/Summer time in the Naki. 2021. Jillian & Zoe.
December 30, 2021
Hi Jillian & Zoe, thanks for sharing your DIY progress. It’s a tough decision but boy those natural boards look gorgeous don’t they! Don’t give up though…where there is a will, there is a way! I’m glad you’ve found some interesting subject matters in my blogs too. Wishing you a safe and happy summer. >>Julie
February 18, 2021
Hi Julie. The house I live in was built in 1960’sand have lovely Matai flooring. We are keen to restore the Matai flooring in our Kitchen as we have just put in a new kitchen. Unfortunately my husband and I are not in a position to DIY. Are you able to recommend some one who can help us out. Thanks. Kumudini
February 18, 2021
Hi Kumudini, it will look beautiful, I’m sure! Gosh, DIY is very much a labour of love. You could contact a local builder or put an advert up on your local community group for a retired (or current) tradie that may want to take it on? Best wishes for a most excellent restoration! >>Julie
October 4, 2020
Hi Julie,
Thanks for the great article.
We are about to start out own matai floor project so am keen to learn as much as possible. I have a few questions :)
How has yours gone in the time since you did them?
How has the Selleys floor filler gone since then? Which selleys product matched the matai the best?
Did you apply the filler before doing any sanding, or do some leveling first?
Many thanks
Neil
October 5, 2020
Hi Neil, you are most welcome. We have since sold the house in question so can’t provide any info on the longevity, other that we had it down a year and it worked extremely well. We don’t work for Selleys nor take commission, but if we recall their floorboard sealant is several times more flexible than their weatherboard sealant, which we also rate highly. We now live in a very large villa and have used dozens of tubes to fill gaps in eves and around windows and doors and it does an excellent job. Back to the flooring question — we did all the prep and sanding first (including filling old nail holes and lightly sanding them off), vacuumed up all the dust, then applied filler in the gaps (using a damp cloth to wipe away excess), then oiled them. You could sand over the sealant once it’s down, but we chose not to. We recall we used ‘walnut’ colour for our old boards as they suited the rustic look. Good luck for your project — we hope you are as pleased with the end result as we were. >>Julie
November 1, 2017
Hi there!
Great to read that reusi g old matai diy works!
Any tips on filling in big holes? Have a few spare bits of wood fortunately.
Cal
November 5, 2017
Hi Cal, if you have big patches missing, chock with matched recycled wood then fill – or replace the whole floorboard if necessary. We had a couple of areas that had rotten (underneath the laundry sink) so we matched and while not perfect, it wasn’t too much of an eye-sore once sanded and oiled. Best of luck >>Julie
August 22, 2017
Hi
I was wondering what the color match to the matai was for the Selley’s No More Gaps for Timber Flooring ?
August 27, 2017
Hi Vickie, we are no longer in that lovely old bungalow – but recall we chose a dark brown/walnut. >>Julie
June 6, 2017
Hi Julie,
Thanks for this post!! Its inspiring me to maybe try my hand at putting some new life into our very sad looking floor without forking out for a company to do it. Im a bit nervous but excited too:) Just a query regarding the refinishing sander you used? I am trowling the web to find one but can only see general floor sanders. any advice on where to hire one? Or what the name of it might be? Im in Wellington. Cheers :)
June 8, 2017
Hi Brid, You are most welcome :) and thanks for asking – we ended up doing it ‘the hard way’ with a lot of elbow grease and a orbital sander. This was because we had started renovating the house in stages. We loved how we could do patches at a time when time allowed rather than clear the whole house of furniture and attempt to do it in one go. A messy job, but do-able! If you are doing the whole house in stages we’d recommend you buy one (not too scary if you plan to use it a while). Cheers, Julie & Jel
May 20, 2017
Hi Julie. Many thanks, will be giving the Selleys a go on the gaps between boards, and may try some PVA on the cracks to try to maintain the boards structural integrity. Yes the Matai boards are beautiful. I kind of wish the ones I have were Danish oiled, not gloss polyurethaned, as think I may have to now re-strip all the kitchen boards (rather than spot repair the varnish) whereas the oil sounds like it’s easier to do touch-up work to. Think I’ll stick with the current finish type though to be consistent with the rest of the house. Many thanks again for the article and helpful advice.
May 18, 2017
Hi, great article. My wife and I’ve purchased a 1905 house in Wellington that has original Matai flooring throughout. These were restored in about 2000 and gloss varnished, and look beautiful apart from the kitchen area (which needs some work as the varnish has worn off in places) and food crumbs seem to accumulate in the gaps between boards. A few of the kitchen floor boards also have longitudinal cracks. Would be really keen to know more about options for filling the gaps between boards, and whether there’s anything that can/should be done with cracked boards? Any further recommendations much appreciated as I’ve not tackled floor board maintenance before!
May 18, 2017
Hi Chris, nice to hear from you. Aren’t wooden floorboards wonderful! OK we’d recommend the Selleys Flexible Floorboard filler hands-down. It’s the ONLY thing we’d use again having researched heaps (and based on our experience with Timbermate). We used Selleys in our laundry and it worked great over the year we had it down – expensive, but stretches to 500% so very flexible. We didn’t have longitudinal cracks, but can’t see why you couldn’t use it for them too (we personally love the dark nail holes and cracks as it adds to the floor’s character). Or if you are after something less obvious, and if the cracks in the board are not too wide (less than 3mm), you could look at a mix of PVA glue and matai sawdust to fill them which would blend colour-wise. Another option is to make thin wedges of matai – bang/glue it in and plane/sand smooth. Cracks lengthwise in the actual boards should be more stable than the gaps between the boards so you can use methods that should not need to expand/contract quite so much. You don’t have to live with gaps with Selleys now! It only came on the market about 18 months ago and it’s the first product specifically designed for this issue. As you can tell, we’re quite the fans now. Good luck with your renovations! Let us know how you go! >>Julie
January 21, 2017
Hi Julie, great article! I was curious as to the Selley’s gap filler…if you have tried it and with which result? If I understood I right sounded in one of the comments that you have used some in the bathroom? I have just ripped out the carpet in the bedroom to free rimu floorboards. They will need sanding and I’ve been trying to find ways of filling the gaps with something that doesn’t crack. If you have found anything I would greatly appreciate your reply. Thanks!
January 29, 2017
Hi Nadine, wow they sound great! Yes we did use Selley’s No More Gaps for Timber Flooring in an area in the laundry and it worked extremely well. We had it down for about a year (before we moved on to a villa) and throughout that time it stayed put and didn’t crack – unlike another Timbermate which did crack through the seasons. So a big tick from us although it will work out to be a little bit expensive when doing a large area. Good luck with your project. It will look great!
November 6, 2016
Hi there Julie, just found your posts as searching for options on t&g floorboard fillers. Like you we are renovating a lovely arts and craft bunalow after relocating it from Hamilton to Katikati and stretching it out with other additions (has been a long process). We were told we had rimu floors, so purchased old rimu floorboards for the hallway and dining room additions, then discovered we had matai. Our floors have a good layer of dark wax to remove and all the skirting boards have been removed (thankfully the paint came off easily with a heat gun (the underlying shellac goes soft to scrape easily) and if you didn’t know methylated spirits works wonders in removing the old shellac to tidy up or to redistribute the shellac and stain. Another recipe to revive an old wooden surface is to mix equal parts – Meths/white spirit/linseed oil give it a good shake before using. This will help clean, melt the old surface finisher and also feed the timber whilst refinishing the surace.
I am also aware of a product for flooring that is from Osmo.UK called Bona Kemi (a craft oil that you can also add their hardwax oil to) apparently this will give you a lovely durable floor surface and like you I want to feed and respect the lovely timber that we have. My only dilema is getting the right stain colour to ensure my floors, skirting and doors all match. So any hints on this would be fabulous. Feel a little nervous in applying stain, as want some colour but still want to appreciate the timber.
November 7, 2016
Wonderful to hear from you Dawn and thanks for sharing your tips. Stain – hmmmmm, to the best of our knowledge it’s a bit of one-way road as it penetrates quite deep and once on you are stuck with it. If you haven’t done so already, a quick trip to either Mitre10 or Bunnings would be worthwhile to have a look at their stain charts showing how different stains work on different woods. We’d probably suggest you try and get very small pots of a range of stains and experiment with offcuts, but even then you may not get a perfect match.
All we can say is that from what we did, we knew we started with matai flooring (which in itself was a range of colours as some was laid in the 20s and others in the 40s, then more reclaimed matai in the recent renovations which again was a slightly different colour again). We just accepted the richness of different colours on the floor. We were fortunate in that we replaced all of the architrave and skirting with new timber (in our case to save cost – unfingered pine). This meant we were able to pick a stain colour that was a compromise between the oiled matai floors and cedar doors and at least that was uniform throughout the house. Even then we had to be careful to put just one coat on as two coats would change the colour further.
It may sound a bit crazy but when we uncovered the natural wood of the windows they too were different woods (matai, rimu, cedar, redwood etc) so we accepted it was going to be a bit eclectic. On top of all this, we bought brand new handmade cedar doors in two batches from different suppliers, and they aren’t the same colour once oiled either. Rather than pulling our hair out in the process of striving for perfection, we say embrace the wood for its beauty, don’t get too hung up on colour matching unless you want to paint (eeek). Good luck with the renovations. Feel free to post up any work-in-progress photos on our Facebook page. >>Julie
September 2, 2016
How woul you handle if the matai floor had borer? Still polish/stain?
September 3, 2016
Hi Rich, thanks for stopping by. In short, yes. If it is just localised and minimal (and long been borer treated) we’d personally oil over the top of it. We like old nail holes and rustic, authentic wooden floors as you may have already guessed, so it adds to the character! If there is too much damage though and the wood is no long solid or stable, you’d probably need to replace it. You can either do this by replacing the chunk panel, or by digging out the effected area and gluing in a slither of matai to patch. Or, something we’ve heard but not done ourselves, is using matai sawdust and PVA glue to fill. We’ve had borer before in a window sill (yet to publish that post) and at the end of the day we replaced the whole sill as it was just ‘too far gone’. All the best with your DIY :) >>Julie
June 15, 2016
How does the oiled floorboards respond to washing? What washing product would you recommend?
June 16, 2016
Hi Anna, That’s a great question. We have only oiled a few floors so far: the walk in pantry and a teenager’s bedroom. To be honest, we have run a vacuum over both to pick up debris from builders and life, worked a dry mop to lift off dust gathering in the corners, and very occasionally wet mop with a light splash of floor disinfectant. Result looks great. We haven’t read any top advice for cleaning ourselves, so we are using a ‘trial and error’ process. So far no errors! I wouldn’t recommend you use anything too heavy-duty as you don’t want to strip out the goodness of the oil that’s protecting the floor. The oil penetrates and feeds the wood so it doesn’t dry out, and the varnish (that’s also contained in Danish Oil) acts as a water repellent hence the more coats you put on the less dirt and grime can get into the wood. Any food splashes or dirty footprints are wiped away without too much of a fuss. Anything bigger and badder (not that we’ve experienced much of that) should easily be sanded out and oil reapplied. We have yet to oil the kitchen and dining room floor therefore we aren’t experts in high ‘foodie/hygiene’ high traffic areas yet. EXCEPT, I should add, we applied Danish Oil to our window frames and a thin ‘splashback’ along the kitchen bench. A damp cloth with mild detergent wipes away grime without fuss. Hope that helps. Let me know if you find anything interesting out there! Cheers >>Julie
May 5, 2016
Are you able to post any photos of the bedroom floor? thx
April 30, 2016
Hi how many oil coats did you apply? thanks
May 1, 2016
The post says 3 layers :)
April 18, 2016
Hi have you got around to oiling your matai floor yet? if so would love an update?
April 18, 2016
Hi Sue, so far so good: we’ve oiled the floorboards of our walk-in larder and a double bedroom using those steps above. The floors are looking great, we’re really happy after a couple of months. The floors are protected and smooth underfoot (definitely the light sand of 120 grit just before applying the oil worked a treat). Dust easily wipes away. We are now underway with more renovations so have decided to leave the remaining floor ‘as is’ until after we’ve finished painting so as to not re-sand etc. At this stage we’d most definitely continue with the oil over polyurethane.
February 9, 2016
Hi, great to read your post regarding timbermate, I used it on our floors to fill the gaps between the boards (6-7yrs ago) and like you I researched. It was easy to use an looked great. In our kitchen dining area most of the timbermate has come out, our two little rooms it has been more successful and most gaps are still filled. I look forward to reading how your next test goes. I was glad to read that I was not the only person that had this problem. Thanks so much for sharing.
February 10, 2016
Thanks for sharing Sietske. No, you were not alone with the Timbermate experience. We have experimented filling a ‘wet floor’ area with our latest ‘find and things are looking positive so far. It has been hot weather since we’ve applied it so just waiting now for a turn of weather to see what happens when the matai floorboards contract! Happy to share our findings as soon as we can. >>Julie
December 7, 2015
Hey there, thanks for your article really enjoyed it, we are looking at taking on a project which has matai floors also, Just curious where you hired the ‘refinishing sander’ and how much was it per day???? I can only see drum sanders when i search hire companies here in NZ??????
Was it hard to use??? any tips..???
Thanks a bunch
December 7, 2015
Hi Wade, great stuff. We have yet to get round to hiring a Refinishing Sander! As far as our research has taken us, a refinishing sander is like 3 x orbital sanders bolted together with the benefit of weighing about 40kg so you don’t have to put your elbow into it. It would certainly cover more area quickly. We are renovating and living in our house so only attempt to work on small areas at a time. Our handheld orbital sander with 80 grip discs has been great for cutting through layers of paint, dirt, shellac and most stains (we bought ours at Bunnings). If the boards are in good condition it can whip through shellac really quickly. Knee pads or a comfy cushion is a good idea!
There is an irony: if you hire a 3-head commercial orbital sander, you’ll may still need a hand-held to get close to the skirting boards and certainly a detailed sander to get into the corners. By the time we get around the edges of our small rooms we kinda figured just to keep going….and jury’s out whether we will end up hiring at all! We’d love to hear what you end up doing. >>Julie
September 23, 2015
Hello, this post has been so useful for me, thank you! We have just recently purchased an old bungalow which has beautiful Matai floors. We have ripped up the old carpet in haste not knowing where to from here. All I know is I wanted to use an oil rather than polyurethane. Your post was perfect timing! I look forward to seeing more updates on the house renovations. Also being a foodie I love the sound of your recipes.
September 23, 2015
Thanks Steph for stopping by. Glad to hear we’re not the only bungalow lovers who aren’t afraid of rolling up our sleeves for some fun DIY. Welcome! I’m just about to publish a post on the different types of matai that may be interesting for you (as we needed to get some boards replaced due to damage). We were surprised to learn first hand that not all matai is the same! Hope to hear from you again some time.
October 24, 2015
Steph….I’ve updated this post today and I wanted to let you know. We actually tried using TimberMate to fill the gaps between the floorboards too in a small section (not just nail holes). This didn’t work so well as the floorboards expand and contract so the filler is inclined to crack (worked great for nail holes).
We’re going to check out something new: Selley’s flexible floor filler especially for floorboard gaps, which we are told will hit the shops early November. We’re very excited and will report back soon as there’s nothing like it on the market. >>Julie